How to Organize a Community Clothing Swap: A Complete Beginner's Guide

Looking for an affordable, sustainable, and community-building event idea? A community clothing swap is one of the easiest ways to bring people together while giving unwanted clothing a second life.

Whether you're organizing an event for a library, school, community center, nonprofit organization, neighborhood group, or arts organization, a clothing swap can help reduce textile waste, encourage sustainable fashion, and create a fun experience for participants.

In this guide, you'll learn how to organize a community clothing swap from start to finish.

What Is a Community Clothing Swap?

A clothing swap is an event where participants bring gently used clothing, shoes, and accessories and exchange them for items brought by others.

Unlike a traditional garage sale or thrift store, no money changes hands. Instead, participants trade items they no longer wear for "new-to-them" pieces.

Clothing swaps have become increasingly popular as people look for affordable and environmentally friendly alternatives to fast fashion.

Why Host a Clothing Swap?

A well-organized clothing swap offers several benefits:

Reduce Textile Waste

Millions of pounds of clothing end up in landfills every year. Clothing swaps help extend the life of garments that still have plenty of wear left.

Promote Sustainable Fashion

Participants learn that refreshing their wardrobe doesn't always require buying something new.

Build Community Connections

Clothing swaps naturally encourage conversation and interaction among attendees.

Make Fashion Affordable

Participants can update their wardrobe without spending money.

Step 1: Choose the Right Venue

Successful clothing swaps need adequate space for sorting and browsing.

Good venue options include:

  • Libraries

  • Community centers

  • Recreation centers

  • Schools

  • Churches

  • Arts organizations

  • Event halls

  • Neighborhood clubhouses

Look for a location with tables, clothing racks, good lighting, and space for participants to move comfortably.

Step 2: Establish Clear Clothing Swap Rules

Clear guidelines help avoid confusion and ensure a positive experience.

Consider addressing:

  • What items are accepted

  • Condition requirements

  • Number of items participants may bring

  • Whether accessories are allowed

  • Check-in procedures

  • Leftover item policies

Communicating expectations early will make the event run much more smoothly.

Step 3: Create a Fair Exchange System

There are several ways to manage a clothing swap.

Ticket System

Participants receive tickets based on the number of items they bring. Tickets are then exchanged for items.

Open Swap

Everyone contributes items and shops freely.

Tiered System

Higher-value items may require multiple tickets.

The best system depends on your audience and event goals.

Step 4: Organize Clothing for Easy Shopping

Treat your clothing swap more like a boutique than a donation pile.

Sort items by category:

  • Women's clothing

  • Men's clothing

  • Children's clothing

  • Shoes

  • Accessories

  • Outerwear

Participants are far more likely to enjoy the experience when items are organized and displayed attractively.

Step 5: Recruit Volunteers

Volunteers can assist with:

  • Check-in

  • Sorting donations

  • Restocking tables

  • Managing fitting rooms

  • Cleanup

  • Donation drop-off after the event

Having enough volunteers is one of the biggest factors in creating a smooth and enjoyable event.

Step 6: Promote Your Clothing Swap

Start marketing your event at least four weeks in advance.

Promote through:

  • Facebook events

  • Community calendars

  • Local newsletters

  • Schools

  • Libraries

  • Instagram

  • Pinterest

  • Community bulletin boards

When promoting your event, emphasize sustainability, affordability, and community connection.

Step 7: Plan for Leftover Clothing

One of the most overlooked aspects of hosting a clothing swap is deciding what happens to unclaimed items.

Options include:

  • Donating to local nonprofits

  • Supporting clothing closets

  • Providing free community pickup

  • Saving items for future events

Have a plan before the event begins.

Creative Clothing Swap Event Ideas

Want to make your clothing swap even more memorable?

Consider adding:

Visible Mending Demonstrations

Teach participants how to repair and personalize garments.

Fashion Upcycling Station

Provide simple embellishments and creative reuse activities.

Sustainable Fashion Resources

Share information about textile waste and conscious consumption.

Style Challenge Activities

Encourage participants to create outfits from swapped items.

These additions can transform a simple swap into a full community experience.

Common Clothing Swap Mistakes to Avoid

Accepting Poor-Quality Items

Require clean, wearable, gently used clothing.

Insufficient Sorting Space

Plan more sorting tables than you think you'll need.

Not Having Enough Volunteers

Understaffing creates bottlenecks at check-in and checkout.

Lack of Clear Communication

Publish rules and expectations well before the event.

Final Thoughts

A community clothing swap is a simple but impactful way to encourage sustainable fashion, reduce waste, and bring people together.

With thoughtful planning, clear guidelines, and a welcoming atmosphere, your event can help participants refresh their wardrobes while building stronger community connections.

Ready to Host Your Own Clothing Swap?

If you'd like a complete step-by-step planning system, check out my digital guide:

How to Host a Clothing Swap: The Complete Community Event Guide

Inside you'll find planning timelines, sample policies, marketing ideas, volunteer recommendations, event logistics, and practical advice to help you organize a successful clothing swap from start to finish.

Whether you're planning an event for a library, school, nonprofit, neighborhood group, or community center, this guide can help you save time and avoid common mistakes.

Learn more here:

https://nikkiwheelerdesigns.com/sale/how-to-host-a-clothing-swap-the-complete-community-event-guide
Ready to Host Your Own Fashion Upcycle Event?

Planning a successful community fashion upcycle event takes more than gathering old clothing and sewing supplies. From recruiting participants and collecting materials to marketing the event and creating engaging activities, there are many details to coordinate.

That's why I created How to Host a Fashion Upcycle Event: The Complete Community Planning Guide—a practical resource designed for arts organizations, libraries, schools, community centers, museums, maker spaces, and community groups.

Inside the guide, you'll find:

  • Event planning timelines

  • Budgeting and supply recommendations

  • Marketing and promotion ideas

  • Workshop and activity suggestions

  • Participant engagement strategies

  • Tips for creating an inclusive, beginner-friendly experience

  • Lessons learned from real-world community arts programming

Whether you're organizing a sustainable fashion workshop, a clothing transformation challenge, a creative reuse event, or a community textile arts project, this guide can help you save time and plan with confidence.

👉 Explore the complete guide here: How to Host a Fashion Upcycle Event: The Complete Community Planning Guide

Start turning unwanted clothing into creativity, connection, and community.

Best Sewing Machines for Costume Designers, Textile Artists, and Creative Sewists (2026 Guide)

Choosing the best sewing machine can feel overwhelming, especially if you're interested in costume design, historical fashion, cosplay, textile art, or garment construction. Walk into any craft store or browse online, and you'll find hundreds of machines ranging from under $100 to well over $2,000.

As a costume designer, sewing instructor, and lifelong textile enthusiast, I've learned that the "best" sewing machine isn't necessarily the most expensive. The best machine is the one that fits your budget, your experience level, and the types of projects you want to create.

Whether you're sewing your first Renaissance Faire costume, making historical garments, creating wearable art, or exploring textile-based mixed media projects, this guide will help you choose the right machine.

What Makes a Good Sewing Machine for Costume Making?

Costume construction often requires a machine that can handle a wide variety of fabrics.

Unlike basic garment sewing, costume projects may include:

  • Cottons and linens

  • Velvet and brocade

  • Canvas and denim

  • Tulle and organza

  • Faux leather

  • Multiple layers of interfacing

  • Decorative trims and embellishments

A good costume-making machine should be reliable, versatile, and easy to maintain.

Features Worth Paying For

When comparing sewing machines, prioritize:

  • Adjustable stitch length

  • Adjustable stitch width

  • Free arm capability

  • Automatic needle threader

  • Drop-in bobbin system

  • Good lighting

  • Strong motor

  • Easy-to-find replacement parts

Features You Probably Don't Need

Many beginners are attracted to machines boasting hundreds of decorative stitches.

In reality, most costume makers regularly use:

  • Straight stitch

  • Zigzag stitch

  • Buttonhole stitch

  • Stretch stitch

That's it.

Don't let fancy marketing convince you that more stitches automatically means a better machine.

Best Sewing Machines Under $200

If you're just beginning your sewing journey, a machine under $200 can be a smart investment.

These machines are ideal for:

  • Beginners

  • Students

  • Casual hobbyists

  • Renaissance Faire costumers

  • First-time cosplay makers

Most modern machines in this category can easily handle common costume fabrics and basic garment construction.

👉 View My Favorite Sewing Machines Under $200

Best Sewing Machines Under $500

If you know sewing is going to be a long-term hobby or professional skill, spending a little more can dramatically improve your experience.

Machines in this range often include:

  • Better stitch quality

  • Stronger motors

  • More durable internal components

  • Greater fabric-handling ability

  • More precise controls

For serious hobbyists, fashion students, and aspiring costume designers, this is often the sweet spot.

👉 View My Favorite Sewing Machines Under $500

Best Sewing Machines for Costume Designers and Textile Artists

If you're regularly working with complex garments, heavy fabrics, artistic textiles, or theatrical costumes, investing in a higher-performance machine can save countless hours of frustration.

Advanced machines offer:

  • Better fabric feeding

  • More consistent stitching

  • Greater durability

  • Expanded creative options

  • Enhanced precision

These machines are excellent for:

  • Costume designers

  • Textile artists

  • Fiber artists

  • Fashion design students

  • Small handmade business owners

👉 View My Favorite Sewing Machines for Costume Designers and Textile Artists

Common Sewing Machine Mistakes Beginners Make

Buying the Cheapest Machine Available

Ultra-budget machines often create more frustration than savings.

Buying a Machine That's Too Advanced

A machine with hundreds of features can be overwhelming when you're still learning basic construction techniques.

Ignoring Maintenance

Even the best machine requires:

  • Regular cleaning

  • Fresh needles

  • Proper threading

  • Quality thread

My Recommendation

If you're completely new to sewing, start with a machine from my Under $200 list.

If you're committed to learning garment construction, costume design, or textile arts, I typically recommend investing in a machine from my Under $500 recommendations. The improvement in sewing experience is often significant.

And if you're already creating costumes, teaching sewing, selling handmade work, or studying fashion design, you'll appreciate the additional capabilities found in my Costume Designer and Textile Artist recommendations.

Ready to Make Your First Costume?

The right sewing machine is only part of the equation.

If you're new to costume construction and want a step-by-step guide to choosing fabrics, understanding sewing techniques, and building your first costume successfully, check out my digital guide:

Your First Costume: The Complete Beginner's Guide to Fabric & Construction

This beginner-friendly resource walks you through the fundamentals of costume making so you can start creating with confidence.

How to Organize a Community Yarn Bomb Project: A Step-by-Step Guide

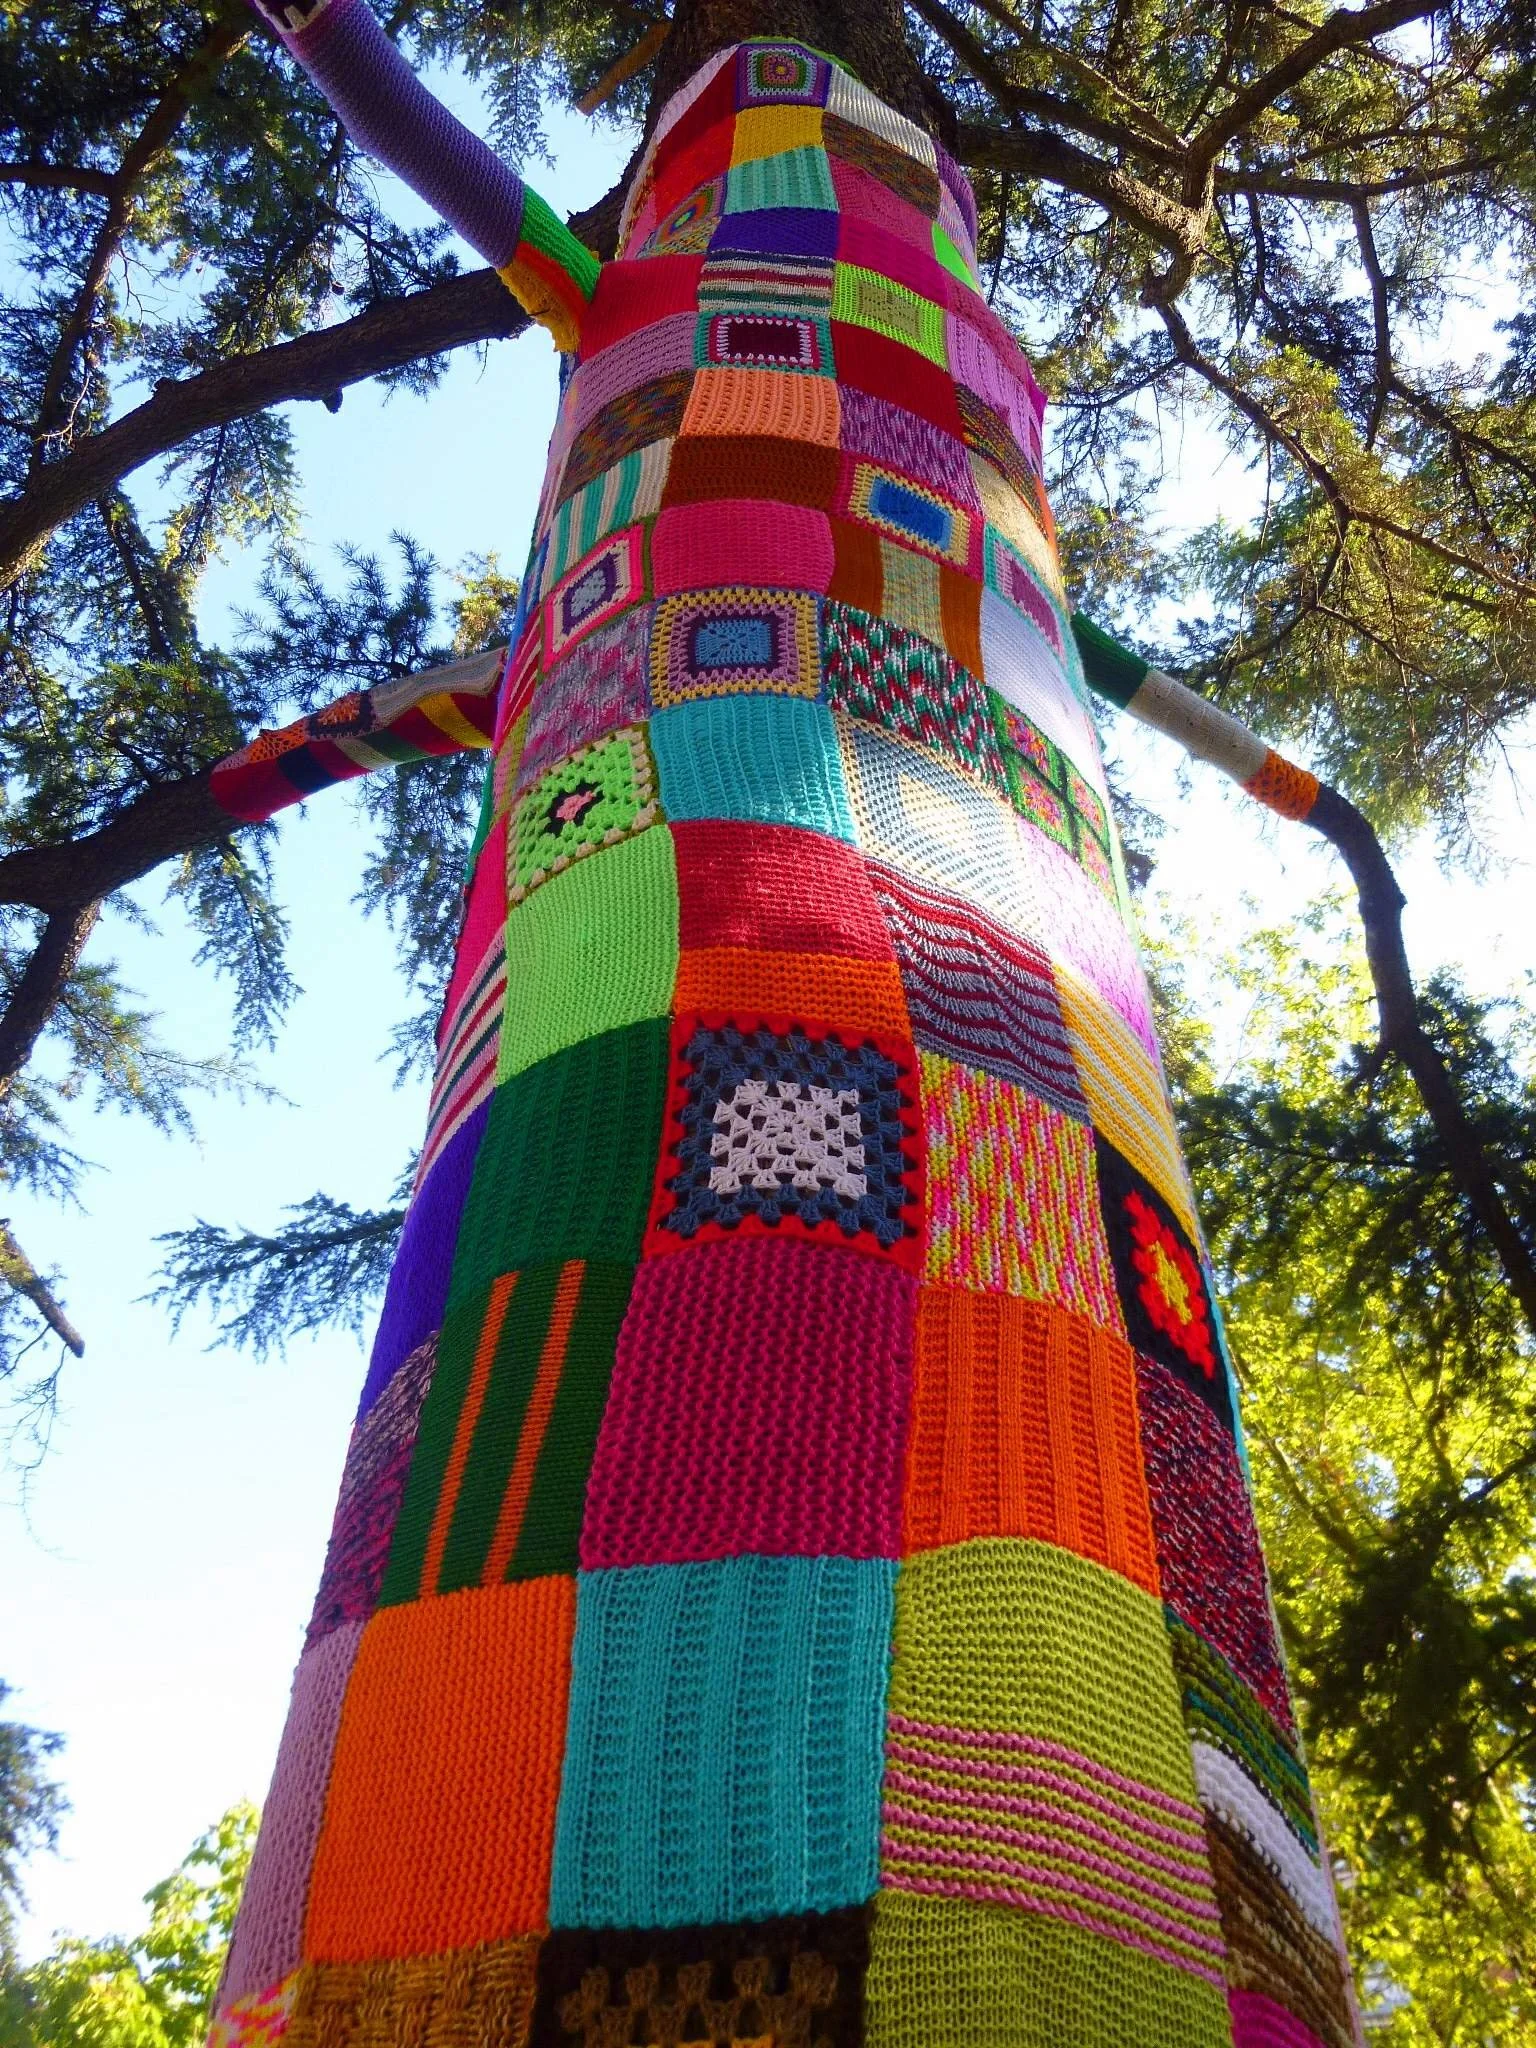
Have you ever walked past a tree wrapped in colorful crochet squares or a park bench covered in knitted artwork and wondered how it all came together?

Community yarn bombs are one of the most accessible and engaging public art projects you can organize. They bring together people of all ages and skill levels, brighten public spaces, and create a sense of community pride that lasts long after the installation is complete.

Whether you're part of a library, arts organization, school, community center, downtown association, or simply a group of enthusiastic fiber artists, this guide will show you how to organize a successful community yarn bomb project from start to finish.

What Is a Community Yarn Bomb?

A yarn bomb is a temporary public art installation created using knitted, crocheted, woven, or stitched pieces. These textile creations are attached to trees, benches, railings, fences, sculptures, and other public spaces to create a colorful and unexpected artistic experience.

Unlike many public art projects, yarn bombing is incredibly approachable. Participants don't need advanced artistic skills to contribute. A single crochet square or knitted panel can become part of a much larger collaborative artwork.

Why Organize a Community Yarn Bomb?

Community yarn bomb projects offer benefits that go far beyond the finished artwork.

They can:

- Bring people together around a shared creative goal

- Encourage participation from all ages

- Create opportunities for social connection

- Beautify public spaces

- Generate local media attention

- Increase community engagement

- Celebrate creativity and craftsmanship

- Provide a welcoming entry point into public art

Many communities discover that a yarn bomb becomes more than an art project—it becomes a memorable community event.

Step 1: Choose Your Location

The first step is selecting a location that is visible, accessible, and appropriate for installation.

Popular locations include:

- Public parks

- Community centers

- Libraries

- Downtown business districts

- School campuses

- Walking trails

- Art centers

Before moving forward, be sure to obtain permission from property owners or local officials if needed.

Step 2: Select a Theme

A theme helps create a cohesive final installation while still allowing participants to express their creativity.

Some popular themes include:

- Community pride

- Local history

- Nature and gardens

- Americana

- Seasonal celebrations

- Cultural heritage

- Color-based themes

Keep the theme broad enough that participants can interpret it in their own unique ways.

Step 3: Decide What Participants Will Make

The easiest way to encourage participation is to keep contributions simple.

Common project pieces include:

- Crochet squares

- Knitted squares

- Granny squares

- Flowers

- Leaves

- Geometric motifs

Many organizers request 4-inch or 6-inch squares because they are beginner-friendly and easy to assemble into larger installations.

Providing a simple pattern can also help participants feel confident about contributing.

Step 4: Recruit Participants

Now it's time to spread the word.

Successful recruitment often includes:

- Social media promotion

- Community newsletters

- Library bulletin boards

- Local yarn shops

- Senior centers

- Schools

- Community organizations

- Word-of-mouth

Consider hosting free stitch-and-social gatherings where participants can work on their pieces together. These events often become one of the most meaningful parts of the project.

Step 5: Collect and Organize Contributions

As contributions begin arriving, create a system for keeping everything organized.

Track:

- Participant names

- Number of pieces submitted

- Sizes and dimensions

- Collection dates

Storage bins, labeled bags, and simple spreadsheets can make the process much easier as your project grows.

Step 6: Plan the Installation

Installation day will go much more smoothly if you prepare in advance.

Before installation:

- Measure installation areas

- Estimate how many pieces you'll need

- Recruit volunteers

- Assign installation teams

- Gather supplies such as zip ties, yarn, scissors, and ladders

Creating a simple site map can help volunteers understand where pieces should be placed and reduce confusion on installation day.

Step 7: Document the Process

Don't wait until the installation is complete to start taking photos.

Document:

- Planning meetings

- Workshops

- Participants creating pieces

- Collection milestones

- Installation day

- The finished project

These photos are invaluable for social media, future promotions, grant applications, annual reports, and community storytelling.

Step 8: Celebrate the Finished Installation

Once the project is complete, take time to celebrate.

Invite:

- Participants

- Families

- Community members

- Local media

- Sponsors

- Community leaders

A simple unveiling event can help participants feel recognized and appreciated while generating excitement for future projects.

Common Challenges and How to Solve Them

Not Enough Contributions

Start promotion earlier than you think necessary and provide beginner-friendly patterns.

Volunteer Shortages

Partner with schools, service organizations, fiber arts groups, and community clubs.

Weather Concerns

Plan for a temporary installation and choose materials that can withstand outdoor conditions for the duration of the project.

Organizational Challenges

Create clear timelines, collection deadlines, and volunteer responsibilities before the project begins.

Final Thoughts

Community yarn bomb projects are a wonderful way to bring people together through creativity. They transform ordinary spaces into colorful works of art while creating meaningful connections between participants.

With thoughtful planning, clear communication, and a welcoming approach, your project can become a memorable community event that inspires creativity and pride for years to come.

Ready to Organize Your Own Community Yarn Bomb?

If you're excited about launching a community yarn bomb but don't want to start from scratch, I've created a detailed guide based on real-world experience organizing community fiber art projects.

The Community Yarn Bomb Guide includes:

✓ Planning timelines

✓ Volunteer coordination tools

✓ Participant recruitment strategies

✓ Promotion and marketing ideas

✓ Installation planning worksheets

✓ Practical tips and lessons learned

Instead of creating your own systems and documents from scratch, you'll have ready-to-use resources that can help you plan a successful project with confidence.

Click here to get the Community Yarn Bomb Guide and start planning your project today.

Beginner-Friendly Renaissance Faire Costume Resources

One of the best things about Renaissance Faire costuming is that you do not need to build an elaborate wardrobe overnight.

Most experienced Faire attendees slowly add:

  • layers,

  • accessories,

  • footwear,

  • belts,

  • cloaks,

  • and character details over time.

If you’re building your first Renaissance Faire outfit, I’ve put together several curated collections of beginner-friendly pieces, accessories, and costume inspiration to help make the process less overwhelming.

Renaissance Faire Costume Supplies

If you’re starting completely from scratch, this collection includes practical beginner-friendly costume pieces, layering essentials, and versatile Faire basics that work well for many different costume aesthetics.

Browse Renaissance Faire Costume Supplies

Viking & Norse Costume Finds

If you’re drawn to Viking-inspired aesthetics, Nordic fantasy styling, faux fur textures, leather accents, and rugged medieval silhouettes, this collection is filled with inspiration for building a Norse-inspired Faire look.

Explore Viking & Norse Costume Finds

Renaissance Faire Belts, Pouches, Bags & Accessories

Accessories are one of the easiest ways to make even a simple Renaissance Faire outfit feel more immersive and complete. Belts, pouches, waist accessories, and layered details instantly add visual texture and practicality.

Shop Renaissance Faire Accessories

Medieval & Renaissance Faire Boots & Shoes for Cosplay

Comfortable footwear can completely change your Renaissance Faire experience. This collection includes beginner-friendly boots and shoes that balance practicality, aesthetics, and all-day wearability.

Browse Medieval & Renaissance Faire Boots & Shoes

Medieval Maiden Dresses for Women

If you love flowing silhouettes, fantasy-inspired gowns, layered skirts, and feminine medieval aesthetics, this collection includes beautiful beginner-friendly dress options for Renaissance Faires, cosplay, fantasy events, and historical-inspired styling.

Explore Medieval Maiden Dresses for Women

How to Start Costume Design When You’ve Never Sewn Before

If you’ve ever looked at an incredible cosplay, historical gown, fantasy costume, or theatrical design and thought:

“I wish I could make something like that… but I have absolutely no idea where to start.”

You are not alone.

One of the biggest misconceptions about costume design is that people think you need:

  • years of sewing experience,

  • expensive equipment,

  • advanced drafting skills,

  • or formal fashion training before you can even begin.

You don’t.

In fact, many successful costume designers started exactly where you are now:

curious, overwhelmed, and creatively excited.

As someone who has worked in costume design, fashion history education, and fiber arts for years, I can tell you this:

beginners often make costume design much harder than it needs to be.

The good news?
You do not need to master every sewing technique before creating your first costume.

You just need to understand:

  • how fabrics behave,

  • how costumes are constructed,

  • and how to start building skills in the correct order.

That’s it.

The Biggest Beginner Mistake in Costume Design

Most beginners start by asking:

“What sewing machine should I buy?”

But honestly?
That is not the first question you should be asking.

The real foundation of costume design is:

understanding fabric and construction.

Because even the most beautiful design will struggle if:

  • the fabric is too stiff,

  • too slippery,

  • too heavy,

  • too sheer,

  • or impossible to sew at your skill level.

Fabric choice affects:

  • silhouette,

  • movement,

  • comfort,

  • durability,

  • and the overall “feel” of a costume.

And this is exactly where most beginners get stuck.

Start Smaller Than You Think

You do not need to begin with:

  • an elaborate ball gown,

  • screen-accurate armor,

  • or a fully boned Victorian corset.

Instead, start with projects that teach:

  • basic construction,

  • seam handling,

  • fabric behavior,

  • and fit.

Some excellent beginner-friendly first costume projects include:

  • simple cloaks,

  • fantasy tunics,

  • kimono-inspired garments,

  • elastic-waist skirts,

  • capes,

  • aprons,

  • or modified thrifted garments.

These projects help you build confidence while still creating something wearable and exciting.

Learn Fabric Before You Learn Complexity

One of the best things a beginner can do is physically interact with fabric.

Go to a fabric store and:

  • touch everything,

  • drape fabrics over your arm,

  • compare stretch vs non-stretch materials,

  • observe transparency,

  • and notice how different fabrics move.

A few beginner-friendly costume fabrics include:

  • cotton broadcloth,

  • quilting cotton,

  • lightweight linen blends,

  • felt,

  • cotton twill,

  • and basic fleece.

I usually recommend beginners avoid:

  • satin,

  • chiffon,

  • sequins,

  • vinyl,

  • and slippery stretch fabrics for their very first projects.

Those materials can be beautiful, but they are much harder to control while learning.

You Don’t Need Expensive Supplies to Begin

Another common misconception:

“I need a fully stocked sewing studio before I can start.”

Absolutely not.

Many beginner costume projects can be completed with:

  • a basic sewing machine,

  • fabric scissors,

  • pins or clips,

  • measuring tape,

  • an iron,

  • and simple thread.

That’s enough to begin learning.

In fact, limitations often help beginners focus on skill-building instead of perfectionism.

Costume Design Is More Than Sewing

This is important.

Costume design is not just garment construction.

It also includes:

  • storytelling,

  • color theory,

  • silhouette,

  • texture,

  • historical inspiration,

  • character analysis,

  • and visual communication.

That means even beginners without advanced sewing skills can start developing:

strong design instincts.

Some of the best ways to improve quickly:

  • study movie costumes,

  • analyze historical fashion,

  • recreate silhouettes using simple materials,

  • sketch ideas,

  • build inspiration boards,

  • and pay attention to how clothing communicates personality and era.

Historical Fashion Is an Incredible Learning Tool

One reason I love teaching historical fashion and costume design is because historical garments teach construction logic incredibly well.

You begin to understand:

  • why silhouettes changed,

  • how layers functioned,

  • how garments were structured,

  • and how fabric choices shaped movement and appearance.

Studying historical fashion improves:

  • cosplay,

  • fantasy design,

  • theater costuming,

  • and even modern fashion understanding.

And honestly?
It makes costume design far less intimidating because you begin seeing garments as:

systems of shapes and structure.

Not impossible magic.

Your First Costume Does NOT Need to Be Perfect

This may be the most important thing in this entire article.

Your first costume is supposed to teach you something.

Not impress the internet.

Every costume designer has:

  • uneven seams,

  • strange fit issues,

  • fabric regrets,

  • abandoned projects,

  • and experimental disasters somewhere in their learning history.

That’s normal.

The goal of your first costume is:

momentum.

Not perfection.

The Fastest Way to Improve

If I could give beginners only one piece of advice, it would be this:

Finish projects.

Even imperfect ones.

Because finishing teaches:

  • problem-solving,

  • construction flow,

  • patience,

  • and confidence.

And confidence matters enormously in costume design.

Ready to Go Deeper?

If you want a beginner-friendly resource that breaks down:

  • fabric basics,

  • costume construction concepts,

  • beginner materials,

  • and how to approach your first project without overwhelm,

I created:

Your First Costume: The Complete Beginner’s Guide to Fabric & Construction

It’s designed specifically for people who are excited about costume design but don’t yet know:

  • where to begin,

  • what fabrics to choose,

  • or how costume construction actually works.

Because everyone starts somewhere — and costume design becomes much less intimidating once you understand the foundations.